Introduction
The Automatic Replies can be used whenever you are unable to respond to e-mail for an extended time.
When the Automatic Replies is turned on, it generates replies to senders based on the Automatic Replies messages that you create. After it is turned on, the Automatic Replies sends an automatic reply to a sender one time during your time away. The Automatic Replies does not respond to subsequent messages from the same sender until you turn off the Automatic Replies and then turn it on again.
If you turn on your Automatic Replies message and do not set start and end times, you will be reminded that it is on every time that you log on to Outlook or Outlook Web App. The reminder gives you the option to keep the Automatic Replies message on or turn it off.
Procedures
Within the Outlook Program
Click File, then select the image below that matches your version of Outlook.
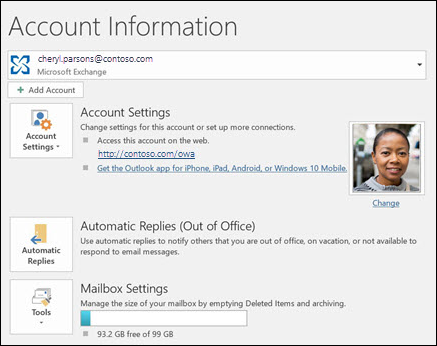
If you see the Automatic Replies button, follow the steps to set up an automatic reply below.
Set up an automatic reply
-
Select File > Automatic Replies.

-
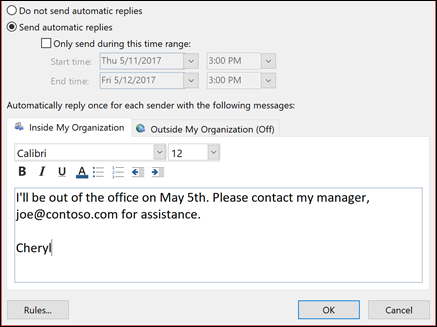
In the Automatic Replies box, select Send automatic replies.
Optionally, set a date range for your automatic replies. This will turn off automatic replies at the date and time you enter for the end time. Otherwise, you'll need to turn off automatic replies manually.
-
On the Inside My Organization tab, type the response that you want to send to teammates or colleagues while you are out of the office.
Note: Sending automatic replies to anyone outside my organization will send your automatic reply to every email, including newsletters, advertisements, and potentially, junk email. If you want to send automatic replies to those outside your organization, we recommend choosing My contacts only.
-
Select OK to save your settings.
Within the Web Application
- Log into Outlook Web App.
- Click the Options button (gear) at upper right in the Outlook Web App window and then the Mail link at the bottom of the list.

- Next, choose Automatic replies under the Automatic Processing section.

- If you want to use the scheduling option, select the Send replies only during this timer period check box, and then use the Start time and End time settings to specify the time period during which you want to send auto-replies. The start and end times apply to Out of Office auto-replies sent to both internal and external senders.

- 5. Type the message that you want the Out of Office Assistant to send to each sender inside UW in the Send a reply once to each sender inside my organization with the following message text box.
- If you would like to send automatic replies to external senders:
- Verify there is a checkmark in Send automatic reply messages to senders outside my organization.
- Select an option to either Send replies only to senders in my Contact list or Send replies to all external senders.
- Type the message you want the Out of Office Assistant to send to each sender outside of UW in the Send a reply once to each sender outside my organization with the following message text box.
- Click Save at the top.
Turn off automatic out-of-office replies
When Outlook is setup to send automatic replies, you'll see a message under the ribbon with this information. Select Turn off to disable automatic out-of-office replies. If you want to modify the dates for your automatic reply or the message sent, use the steps above to modify your settings.

In Outlook Web App, upon logging in, you will be asked if you would like to turn them off. To turn them off, select Yes.